
Easy to start.
Clear visibility throughout your study.
Register your Account, configure your study and bring subjects, sites and clinical supply into one connected operational view. Manage the work with permissions and blinding appropriate to each team member.
The signup link opens Agilix RTSM. Self-service registration must be enabled by the System Administrator.
Self-service signup.
Core features from the Free tier.
New Accounts start on the Free tier. Every tier includes core RTSM capabilities; plan limits govern scale, not which core workflows you can use.
Register as Account Administrator
Create your organization Account and administrator credentials, then verify your email using the code sent to your inbox. Every sign-in requires your password and a single-use email code; do not share logins or codes.
Signup procedure →Understand your capacity
The navigation badge identifies your current tier. Study, site, depot and subject quotas are checked by the application; blocked actions explain when a tier upgrade is needed.
Explore tiers and cost estimates →Manage the subscription
Account Administrators can review usage, select a tier and view monthly invoices in their Account profile. Pricing estimates are illustrative; saved application pricing and billing records govern the Account.
Seven steps.
Each one gated by the application.
This is the order the application enforces. A step that is not complete blocks the next one and explains why, so a study cannot go live until its design is approved and its user acceptance testing (UAT) package is released by QA.
- 01Account Administrator
Register and verify the Account.
Create the organization Account and administrator credentials at Create an account, then confirm your email with the six-digit code. Each later sign-in requires your password and a new single-use email code.
Done when: you can sign in and the navigation shows your Account and Free tier badge.
- 02Account Administrator
Execute the customer agreements.
Under Account › Customer agreements, review and electronically sign the Master SaaS Agreement, GxP Quality Agreement, Service Level Agreement and Data Processing Addendum. Until all four are signed, access to the Account's study workspace is suspended.
Done when: all four agreements show as executed, with the signer, time and source IP recorded.
- 03Account Administrator
Invite the team and assign roles.
Add users with the roles they need, for example a study designer, a second person to approve designs, site staff, depot staff and a read-only Quality Assurance reviewer. Assign the studies and sites each user may access.
Done when: each invited user has verified their email and signed in.
- 04Study designer
Create the study, sites and depots.
Create the study (it starts in Setup). Add sites individually or by CSV import, add depots, and record each site's address, consignee and investigator details.
Done when: the study appears in the study selector with its sites and depots listed.
- 05Study designer → second person
Configure and approve the design.
Complete Study Design Steps 1–8 (see configuration steps below). A different authorized user then reviews and e-signs the design revision at Step 9. Each later design change starts a new revision that must be approved again.
Done when: Step 9 shows the current design revision as approved.
- 06Study team → Quality Assurance
Generate the master list and complete UAT.
Review dummy randomization data, then create the master randomization list (Step 10). Under Lifecycle & Exports, execute the UAT package for the approved design revision; QA reviews and releases it. A later design change supersedes the package.
Done when: the UAT package for the current design revision is QA-released.
- 07Study team & sites
Activate and operate.
Activate the study. The application rejects activation until the current design revision is approved and has a QA-released UAT package (21 CFR 11.10(a)). Then activate sites, release depot lots, ship initial supply and start screening and randomizing subjects.
Done when: the study status is Active and the first subject is randomized and dispensed.
The Study Design page,
step by step.
Open the study and complete the protocol information on the Settings tab first, then work through the Design tab in step order. Step 1 has its own save actions. Steps 2–7 are saved together at Step 8. Treatment arms, product mappings and ratios are locked once depot lots exist, and changing the design of a live study requires an amendment reason.
Investigational products
Define each product, its unit and units per kit, and its packaging and label details. Save this step on its own.
Treatment arms
Add arms with codes, allocation ratios and the products each arm dispenses. Blinded users never see arm identity.
Randomization
Choose permuted-block or minimization, block sizes and assignment probability. Steps 3, 4 and 7 can be changed only by an unblinded user authorized to manage randomization.
Stratification factors
Add factors and their levels, for example site region or disease severity, used to balance allocation.
Cohorts (optional)
Define ordered cohorts with enrollment caps. A cohort closes to enrollment automatically when it reaches its cap.
Visit schedule
Add visits, windows and dispensing visits. Set a country code to branch a visit for one jurisdiction, and enable unscheduled dispensing only where the protocol allows it.
Dosing & dispensation
Select the dosing mode: fixed, weight-based, BSA-based, bracketed, titration or biomarker-adaptive. Then set the quantities issued per visit.
Save design
Save Steps 2–7 as a new design revision. For a live study, record the amendment reason; the change is written to the audit trail.
Design approval
A second, unblinded user with study-management permission reviews and e-signs the revision. If the design changed after their review, they must reload and review it again.
Master randomization
Review dummy data, then create the operational master list from the saved, approved design. Export it under Lifecycle & Exports when required.
Before you activate
Also set site supply thresholds and replenishment on Forecast & rebalancing, confirm which users are unblinded, and confirm every user's study and site assignments. Configuration is your organization's validated decision: document it in your approved configuration specification.
Full study design procedure →Your protocol.
A connected study workspace.
Configure study design, sites, products, treatment arms and visits; review dummy randomization data before creating the operational master. Assign users and site scope without weakening Account isolation or blinding.
Study design with guardrails
Save protocol settings, review generation inputs and apply authorized amendments. Unscheduled dispensing is permitted only when enabled in the protocol's Visit Schedule.
Configure the study →Subject and site workflows
Screen and randomize subjects, follow visit progress, dispense and verify kits, and retain accountability history. The Subject page shows available site inventory by product alongside the working record.
Additional dispensation procedure →Controlled team access
Define operational roles and site assignments. A maximum of two active Account Administrators may manage an Account; other authorized users retain their assigned responsibilities.
Roles and permissions →A connected view.
From enrollment to accountable supply.
Visibility covers the RTSM records your role is authorized to see. It does not expose another Account's data, reveal treatment to blinded users, or replace a clinical data-management system.
Subjects and study progress
Review enrollment, randomization, visit schedules, issued kits and verification status in the selected study.
Site and depot inventory
Forecast & rebalancing shows site status, available and dispensed quantities by IP, and depot availability beneath the site table. Authorized site links open address, consignee and investigator details.
Inventory and forecast procedure →Supply and exceptions
Follow shipment dispatch and receipt, supply projections, temperature readings, excursions and permission-scoped alerts. Available stock still needs to pass allocation and handling checks.
Records for review
Use scoped reports, audit events, electronic-signature context and retained document versions to understand what happened, when and under whose authority.
Understand the controls →Make each handoff
an explicit decision.
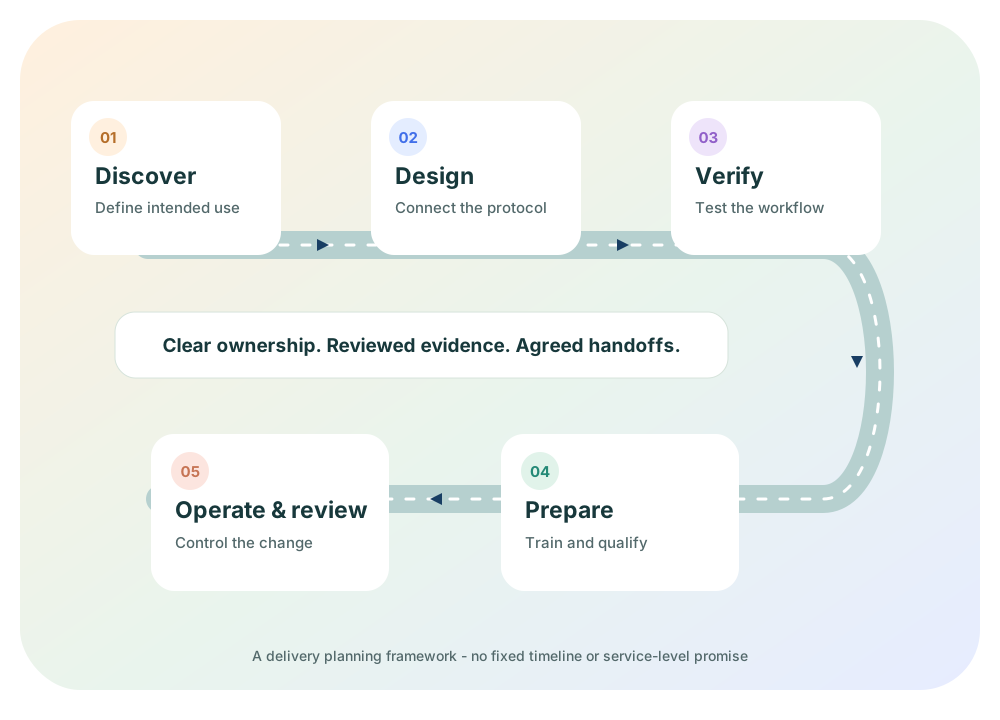
Use these stages to structure implementation discussions. The sequence is a recommended planning approach, not a contracted service package or a promise of fixed launch dates.
- 01Discover & align
Define the intended use.
Review the protocol, countries/sites, arms, strata, cohorts, visits, crossover, blinding plan and product accountability. Identify supply constraints, stakeholders and assumptions requiring clarification.
Planning output: reviewed requirements, risk priorities and named decision owners.
- 02Design & configure
Connect the study to its supply.
Map saved design settings to allocation and visits. Agree master-list strategy, dummy review, packaging labels, kit/quantity models, site thresholds, replenishment and exception handling.
Planning output: reviewed configuration specification and traceable workflow decisions.
- 03Verify & accept
Test the meaningful boundaries.
Exercise representative roles, blinded/unblinded views, allocation, multi-product issuance, verification identifiers, crossover, supply exceptions and document lifecycle. Include negative paths and recovery conditions.
Planning output: approved acceptance evidence, assessed deviations and a release decision.
- 04Prepare & qualify
Make operational readiness visible.
Approve user provisioning and training, hosting controls, HTTPS, persistent keys, backup/restore, monitoring, procedures and escalation contacts. Confirm which responsibilities belong to the sponsor, site, supply and technology teams.
Planning output: agreed readiness checklist and documented operational handover.
- 05Operate, amend & close
Keep change and history connected.
Review access and supply exceptions, manage protocol amendments under change control, assess their testing impact and retain original assignment meaning. Plan end-of-study reconciliation, archive accessibility and approved retention.
Planning output: controlled changes, reconciled records and a reviewed retention/closeout approach.
Different expertise.
Shared study context.
Study & site operations
Clarify visit windows, eligibility confirmations, site access, physical verification and escalation when the next action cannot proceed. Training should use the user's actual role and approved workflow.
Clinical supply
Align products, lots, labels, units per kit, quantities, packaging release, stock thresholds and cold-chain disposition. Reconcile supply assumptions before configuring exceptions.
Quality & technology
Align intended-use validation, access controls, deployment qualification, interfaces, audit review and retention. Engineering and infrastructure changes need separately approved scope and evidence.
Explain the task.
Show the next step.
The Agilix knowledge base provides original guides with workflow steps, prerequisites, field references, troubleshooting checks and redacted application illustrations where available.
It supports onboarding and shared understanding; it does not replace your approved procedures, role-specific training or acceptance records.
Explore the knowledge base →Agree the engagement before relying on it.
Confirm deliverables, owners, implementation scope, training, support channels, response expectations and acceptance criteria through your approved agreement. This page does not promise dedicated staffing, 24/7 support, fixed delivery times or service levels. The Contact form sends your inquiry to Agilix support; it does not confirm a meeting or an agreed engagement.
Send a focused walkthrough inquiry →